


Negli ultimi anni l’automazione dell’infrastruttura è diventata un elemento fondamentale per semplificare la gestione degli ambienti IT, migliorare la coerenza delle configurazioni e ridurre i tempi operativi.
In questo contesto AWX la versione open source di Ansible Tower rappresenta una soluzione particolarmente interessante per centralizzare playbook, job template, credenziali e workflow di automazione attraverso un’interfaccia web intuitiva.
Allo stesso tempo l’adozione di distribuzioni Kubernetes leggere come K3S ha reso possibile eseguire workload containerizzati anche in ambienti più snelli, di laboratorio o edge, senza rinunciare ai vantaggi dell’orchestrazione.
Se a questo aggiungiamo Rancher, otteniamo un livello ulteriore di semplificazione nella gestione del cluster grazie a una console centralizzata e a strumenti pratici per il deployment e il monitoraggio delle applicazioni.
In questo articolo vedremo come eseguire l’installazione di AWX su K3S utilizzando Rancher analizzando i prerequisiti, i componenti necessari e i passaggi principali per arrivare a una piattaforma di automazione funzionante, moderna e facilmente amministrabile.
L’obiettivo è costruire un ambiente solido e replicabile utile sia per test che per scenari più strutturati.
PREREQUISITI
Un server Ubuntu 24.04 con queste caratterstiche:
- almeno 4 vCPU / 8 GB RAM come minimo pratico;
- meglio 8 vCPU / 16 GB RAM se vuoi usare Rancher + AWX senza sofferenze
un FQDN
porte aperte: 22, 80, 443
un utente con privilegi di sudo
Per Rancher su K3s conviene scegliere una versione Kubernetes supportata.
La matrice Rancher corrente indica supporto per K3s da v1.32 a v1.34, quindi in questa guida fisserò una release K3s v1.32.x per stare in zona sicura.
AGGIORNAMENTO DI UBUNTU E INSTALLAZIONE DEGLI STRUMENTI BASE
Aggiornare Ubuntu con i seguenti comandi:
|
0
1
|
sudo apt update && sudo apt -y upgrade
sudo apt -y install curl wget git vim jq apt-transport-https ca-certificates gnupg lsb-release
|
Controllare l’IP del server con il comando:
|
0 |
hostname -I
|
Supponiamo che l’IP sia 192.168.1.50.
Per il laboratorio puoi usare questi hostnames:
rancher.test.lab – 192.168.1.50
awx.test.lab – 192.168.1.50
INSTALLAZIONE DI K3S
Rancher documenta l’installazione di K3s con cluster-init anche su singolo nodo, così mantieni una via semplice verso una futura migrazione HA.
K3s installa anche i link a kubectl di default se non già presenti nel PATH.
Installare K3s fissando una release supportata con il comando:
|
0 |
curl -sfL https://get.k3s.io | INSTALL_K3S_VERSION="v1.32.6+k3s1" sh -s - server --cluster-init
|
Verificare che tutto sia ok con i seguenti comandi:
|
0
1
2
|
sudo systemctl status k3s --no-pager
sudo kubectl get nodes -o wide
sudo kubectl get pods -A
|
Configurare il kubeconfig per il tuo utente con i seguenti comandi:
|
0
1
2
3
4
|
mkdir -p ~/.kube
sudo cp /etc/rancher/k3s/k3s.yaml ~/.kube/config
sudo chown $USER:$USER ~/.kube/config
export KUBECONFIG=~/.kube/config
echo 'export KUBECONFIG=~/.kube/config' >> ~/.bashrc
|
Verificare i nodi con il comando:
|
0 |
kubectl get nodes
|
Dovremmo visualizzare un output simile al seguente:
|
0
1
|
NAME STATUS ROLES AGE VERSION
vm-srv-ubu-awx Ready control-plane,etcd,master 76s v1.32.6+k3s1
|
CONTROLLO DI TRAEFIK E DELLO STORAGE CLASS
K3s include di default l’ingress controller. Per Rancher non serve installarne uno extra su K3s.
Verificare che Traefik sia presente con i comandi:
|
0
1
|
kubectl get pods -n kube-system | grep traefik
kubectl get svc -n kube-system
|
Verificare lo storage class di default con il comando:
|
0 |
kubectl get storageclass
|
Su K3s normalmente trovi local-path come default sufficiente per una AWX con database interno in ambiente lab.
INSTALLAZIONE DI HELM
Rancher richiede Helm 3.
Eseguire i comandi per installare Helm:
|
0
1
2
3
|
curl -fsSL -o get_helm.sh https://raw.githubusercontent.com/helm/helm/main/scripts/get-helm-3
chmod +x get_helm.sh
sudo ./get_helm.sh
helm version
|
Dovremmo visualizzare il seguente output:
|
0 |
version.BuildInfo{Version:"v3.20.0", GitCommit:"b2e4314fa0f229a1de7b4c981273f61d69ee5a59", GitTreeState:"clean", GoVersion:"go1.25.6"}
|
INSTALLAZIONE DI CERT-MANAGER
La documentazione cert-manager raccomanda l’installazione via chart Helm/OCI e con crds.enabled=true.
La release indicata nella documentazione corrente è v1.19.4.
Eseguire i comandi:
|
0
1
2
3
4
|
helm install cert-manager oci://quay.io/jetstack/charts/cert-manager \
--version v1.19.4 \
--namespace cert-manager \
--create-namespace \
--set crds.enabled=true
|
Aspettare che sia pronto quindi eseguire i comandi:
|
0
1
2
3
|
kubectl rollout status deployment -n cert-manager cert-manager
kubectl rollout status deployment -n cert-manager cert-manager-webhook
kubectl rollout status deployment -n cert-manager cert-manager-cainjector
kubectl get pods -n cert-manager
|
INSTALLAZIONE DI RANCHER
Rancher si installa via Helm nel namespace cattle-system esposto tramite Ingress HTTPS.
Il chart supporta opzioni come bootstrapPassword, hostname e ingress.tls.source.
Aggiungere il repository e creare il namespace con i seguenti comandi:
|
0
1
2
|
helm repo add rancher-latest https://releases.rancher.com/server-charts/latest
helm repo update
kubectl create namespace cattle-system
|
Opzione più semplice per lab: certificato generato da Rancher
Usa ingress.tls.source=rancher che è il default del chart Rancher. Il chart supporta anche bootstrapPassword.
Eseguire i comandi:
|
0
1
2
3
4
|
helm upgrade --install rancher rancher-latest/rancher \
--namespace cattle-system \
--set hostname=rancher.192.168.1.50.sslip.io \
--set bootstrapPassword='AdminTemp!2026' \
--set replicas=1
|
Dovremmo visualizzare il seguente output:
|
0
1
2
3
4
5
6
7
8
9
10
11
12
13
14
15
16
17
18
19
20
21
|
Rancher Server has been installed. Rancher may take several minutes to fully initialize.
Please standby while Certificates are being issued, Containers are started and the Ingress rule comes up.
Check out our docs at https://rancher.com/docs/
## First Time Login
If you provided your own bootstrap password during installation, browse to https://rancher.mypsx.net to get started.
If this is the first time you installed Rancher, get started by running this command and clicking the URL it generates:
```
echo https://rancher.mypsx.net/dashboard/?setup=$(kubectl get secret --namespace cattle-system bootstrap-secret -o go-template='{{.data.bootstrapPassword|base64decode}}')
```
To get just the bootstrap password on its own, run:
```
kubectl get secret --namespace cattle-system bootstrap-secret -o go-template='{{.data.bootstrapPassword|base64decode}}{{ "\n" }}'
```
Happy Containering!
|
A questo punto eseguire il rollout con i seguenti comandi:
|
0
1
2
|
kubectl rollout status deployment -n cattle-system rancher
kubectl get pods -n cattle-system
kubectl get ingress -n cattle-system
|
Controllare l’URL di bootstrap con il comando:
|
0 |
echo "https://rancher.192.168.1.50.test.lab/dashboard/?setup=$(kubectl get secret --namespace cattle-system bootstrap-secret -o go-template='{{.data.bootstrapPassword|base64decode}}')"
|
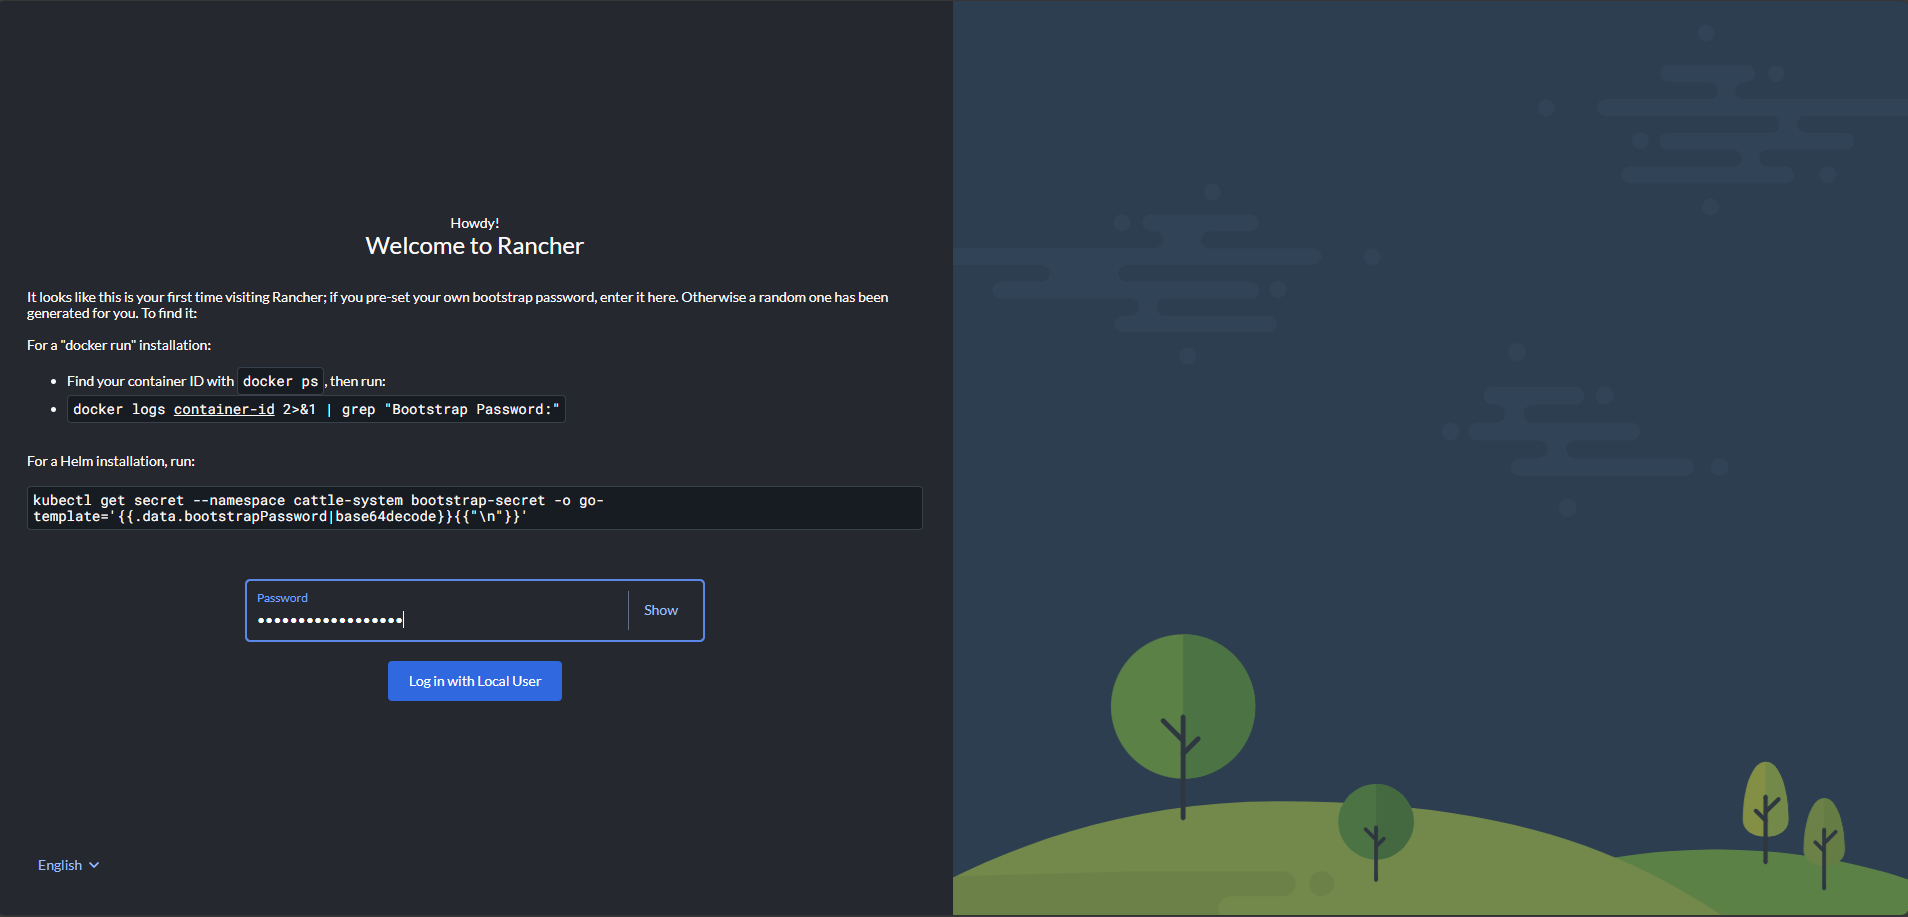
Aprire l’URL nel browser. Al primo accesso accettare il certificato self-signed quindi inserire la password
Cliccare su Login with Local User

Inserire l’URL del server corretto
Rancher richiede HTTPS e la sua documentazione mostra hostname come parametro fondamentale del chart.
Cliccare Continue
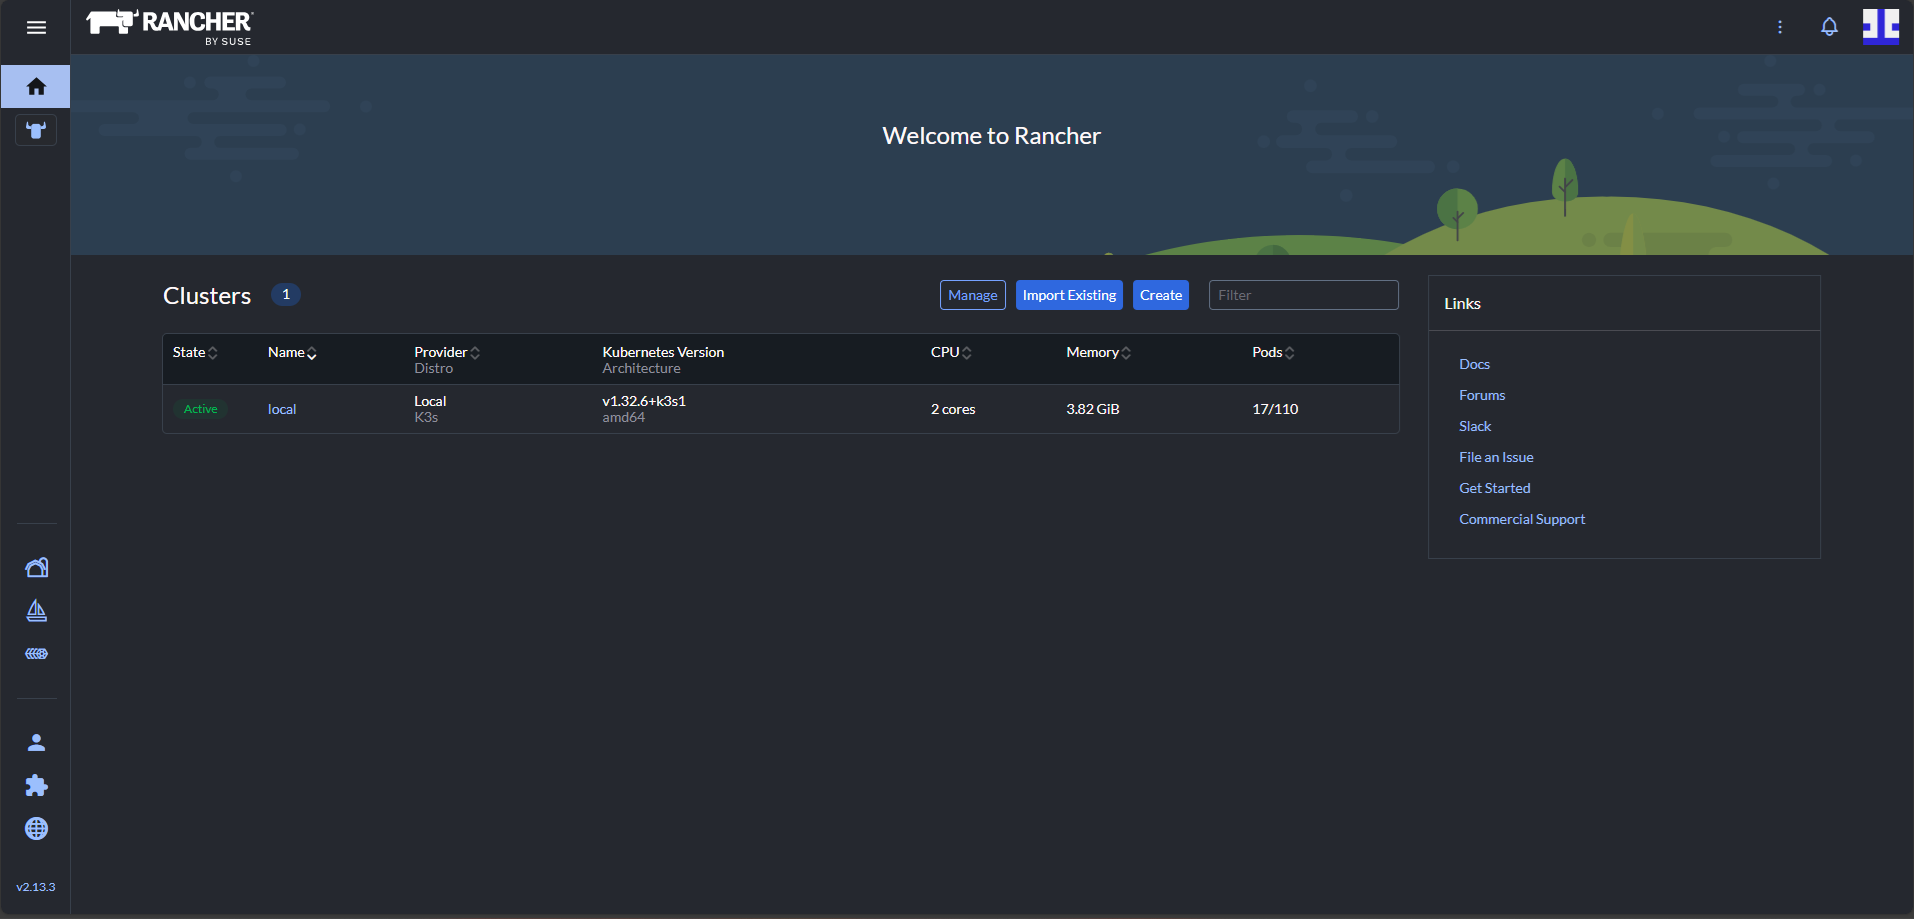
Se tutto è andato bene dovremmo visualizzare la Dashboard del Rancher
Quando si accede in Rancher la prima cosa che si vede è il cluster locale.
Questo cluster può ospitare anche AWX.
Per un lab va bene usare il local cluster.
In produzione di solito si separa il cluster di management da quello dei workload.
INSTALLAZIONE DI AWX OPERATOR
L’AWX Operator si installa nel cluster e gestisce il ciclo di vita di AWX nello stesso namespace.
L’installazione ufficiale base usa Kustomize con una kustomization.yaml che punta al tag dell’operator.
Creare il namespace con il comando:
|
0 |
kubectl create namespace awx
|
Creare una cartella di lavoro con il comando:
|
0
1
|
mkdir -p ~/awx-operator-install
cd ~/awx-operator-install
|
Creare kustomization.yaml con il comando:
NOTA BENE: Consiglio di usare un tag esplicito invece del branch devel. La doc ufficiale mostra proprio questo schema con github.com/ansible/awx-operator/config/default?ref=<tag>.
|
0
1
2
3
4
5
6
7
8
9
10
11
12
|
cat > kustomization.yaml <<'EOF'
apiVersion: kustomize.config.k8s.io/v1beta1
kind: Kustomization
resources:
- github.com/ansible/awx-operator/config/default?ref=2.7.2
images:
- name: quay.io/ansible/awx-operator
newTag: 2.7.2
namespace: awx
EOF
|
Applicare con il comando:
|
0 |
kubectl apply -k .
|
Verificare con i seguenti comandi:
|
0
1
2
|
kubectl get pods -n awx
kubectl get deployments -n awx
kubectl get crd | grep awx
|
Dovremmo vedere il seguente output:
|
0
1
2
3
4
5
6
7
8
9
10
11
12
13
14
15
16
17
18
19
|
kubectl get pods -n awx
kubectl get deployments -n awx
kubectl get crd | grep awx
NAME READY STATUS RESTARTS AGE
awx-operator-controller-manager-59669d4d4-6wcck 0/2 ErrImagePull 0 20s
NAME READY UP-TO-DATE AVAILABLE AGE
awx-operator-controller-manager 0/1 1 0 20s
awxbackups.awx.ansible.com 2026-03-08T16:54:22Z
awxrestores.awx.ansible.com 2026-03-08T16:54:22Z
awxs.awx.ansible.com 2026-03-08T16:54:22Z
root@vm-srv-ubu-awx:~/awx-operator-install# kubectl get pods -n awx
NAME READY STATUS RESTARTS AGE
awx-operator-controller-manager-59669d4d4-6wcck 1/2 ImagePullBackOff 0 36s
root@vm-srv-ubu-awx:~/awx-operator-install# kubectl get deployments -n awx
NAME READY UP-TO-DATE AVAILABLE AGE
awx-operator-controller-manager 0/1 1 0 44s
root@vm-srv-ubu-awx:~/awx-operator-install# kubectl get crd | grep awx
awxbackups.awx.ansible.com 2026-03-08T16:54:22Z
awxrestores.awx.ansible.com 2026-03-08T16:54:22Z
awxs.awx.ansible.com 2026-03-08T16:54:22Z
|
CREAZIONE DI AWX
L’operator supporta servizi ClusterIP, LoadBalancer e NodePort; per ingress di default non crea nulla finché non imposti ingress_type.
Supporta ingress_type: ingress e campi come ingress_class_name, ingress_hosts, ingress_annotations.
Di seguito riporto una configurazione pulita con:
- service interno ClusterIP
- Ingress gestito da Traefik
- hostname dedicato
- storage class local-path
- admin password predefinita in Secret
- Crea la password admin
La documentazione AWX chiarisce che admin_password_secret deve essere un Secret Kubernetes; se non lo si passa, l’operator genera <resourcename>-admin-password.
Eseguire il comando:
|
0
1
2
3
4
5
6
7
8
|
cat > awx-admin-secret.yaml <<'EOF'
apiVersion: v1
kind: Secret
metadata:
name: awx-admin-password
namespace: awx
stringData:
password: "AwxAdmin!2026"
EOF
|
Applicare con il comando:
|
0 |
kubectl apply -f awx-admin-secret.yaml
|
Creare il manifest di AWX con il comando:
|
0
1
2
3
4
5
6
7
8
9
10
11
12
13
14
15
16
17
18
19
20
21
22
23
24
25
26
27
28
29
30
31
32
33
34
35
36
37
38
39
40
41
42
43
44
|
cat > awx.yaml <<'EOF'
apiVersion: awx.ansible.com/v1beta1
kind: AWX
metadata:
name: awx
namespace: awx
spec:
admin_user: admin
admin_email: admin@example.local
admin_password_secret: awx-admin-password
service_type: ClusterIP
ingress_type: ingress
ingress_class_name: traefik
ingress_annotations: |
kubernetes.io/ingress.class: traefik
ingress_hosts:
- hostname: awx.mypsx.net
projects_persistence: true
projects_storage_class: local-path
projects_storage_size: 5Gi
postgres_storage_class: local-path
postgres_storage_requirements:
requests:
storage: 8Gi
web_resource_requirements:
requests:
cpu: 500m
memory: 1Gi
limits:
cpu: 1
memory: 2Gi
task_resource_requirements:
requests:
cpu: 500m
memory: 1Gi
limits:
cpu: 1
memory: 2Gi
EOF
|
Applicare con il comando:
|
0 |
kubectl apply -f awx.yaml
|
Controllare l’avanzamento con il comando:
|
0 |
kubectl get pods -n awx -w
|
Quando i pod sono pronti eseguire i comandi:
|
0
1
2
3
|
kubectl get awx -n awx
kubectl get svc -n awx
kubectl get ingress -n awx
kubectl get pvc -n awx
|
RECUPERARE LA PASSWORD DI AWX
Se hai usato il Secret che ti ho fatto creare in precedenza la password è già quella impostata.
In ogni caso la doc ufficiale AWX indica che la password è leggibile dal secret <resourcename>-admin-password.
Nel nostro caso eseguire il comando:
|
0 |
kubectl get secret awx-admin-password -n awx -o jsonpath="{.data.password}" | base64 --decode ; echo
|
Aprire quindi il seguente link da qun qualsiasi browser:
http://awx.mypsx.net
oppure se il tuo ingress forza HTTPS in base alla configurazione del controller/certificato aprire il seguente link:
https://awx.mypsx.net
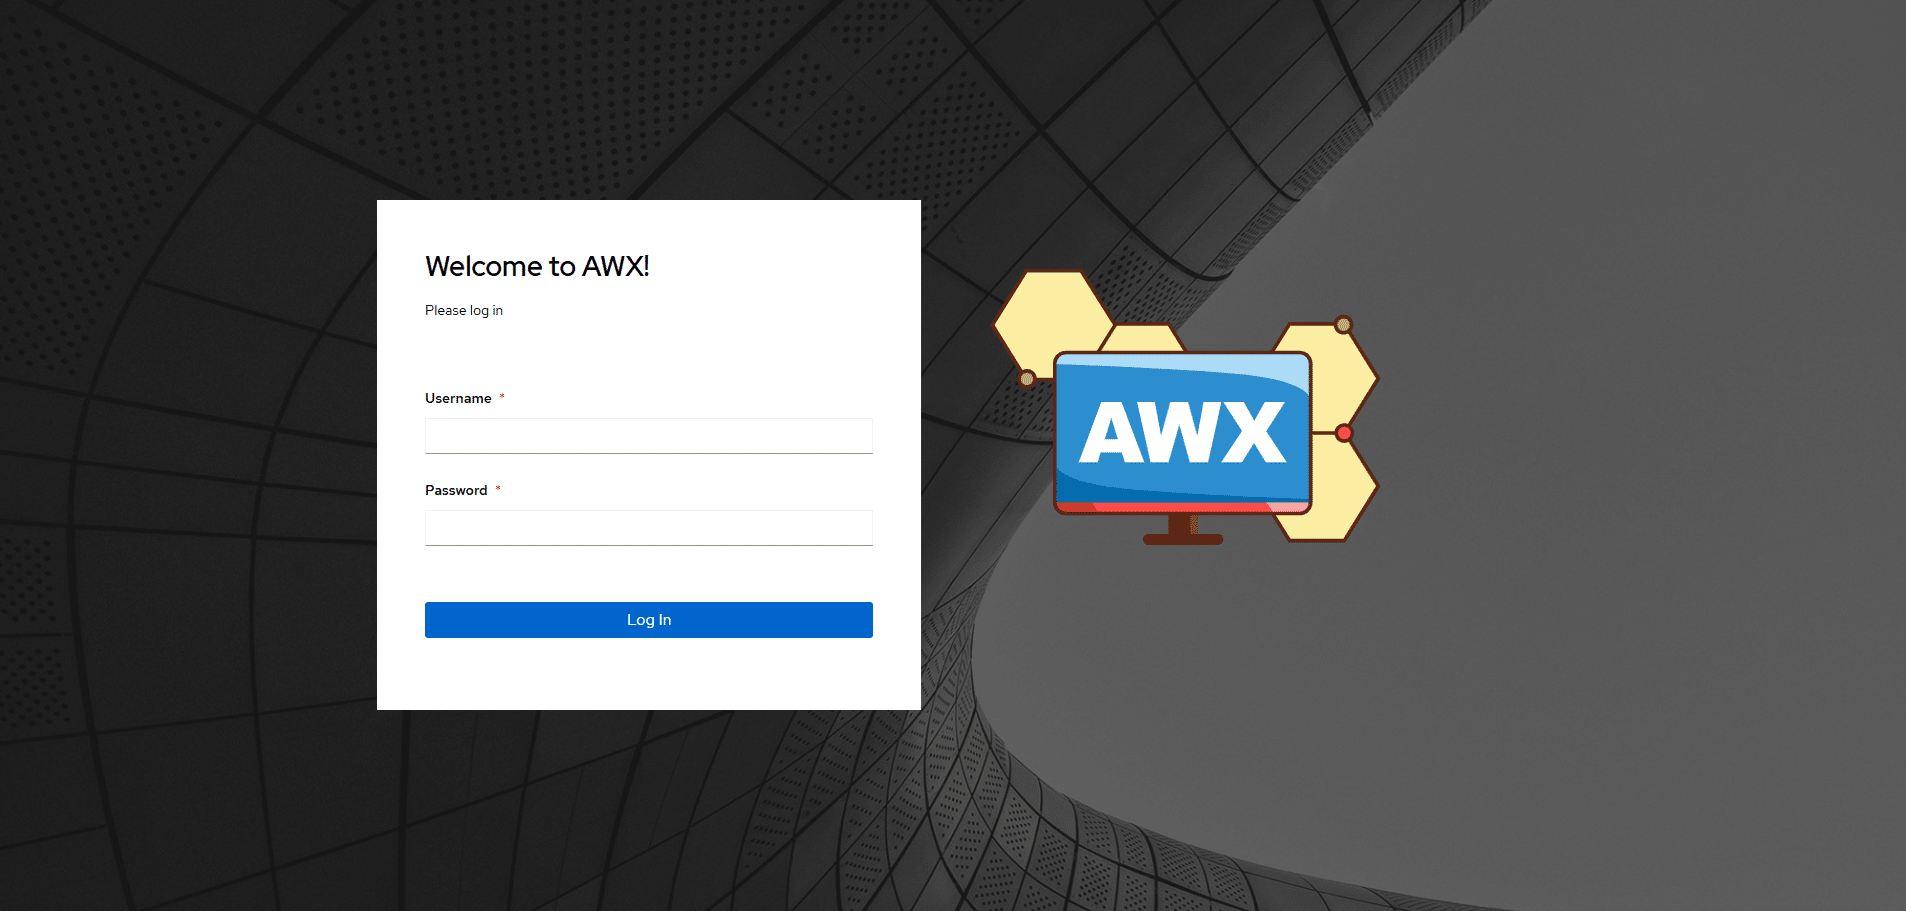
Se è tutto corretto dovremmo visualizzare la pagina di accesso di AWX
AWX NON RISPONDE SUBITO: COSA FARE?
Controlli rapidi da eseguire:
|
0
1
2
3
4
|
kubectl describe awx awx -n awx
kubectl logs -n awx deployment/awx-operator-controller-manager
kubectl get events -n awx --sort-by=.metadata.creationTimestamp
kubectl describe ingress -n awx
kubectl describe pvc -n awx
|
I problemi più comuni sono questi:
hostname non risolto: verifica ping awx.test.lab
pod postgres in errore: quasi sempre storage/PVC
Ingress creato ma la pagina non si apre: verificare che Traefik sia attivo in kube-system
AWX ancora Progressing: aspettare qualche minuto, il primo deploy scarica molte immagini e ci va tempo
AGGIORNAMENTI FUTURI
K3s: usa una versione supportata dalla matrice Rancher prima di aggiornare Rancher o Kubernetes.
cert-manager: aggiornalo con Helm, mantenendo una release supportata.
AWX Operator: usa tag espliciti e non devel in produzione/lab stabile. La doc base dell’operator è proprio costruita attorno al concetto di tag/versione.


0 commenti