



CrowdSec si è ormai affermato come alternativa moderna e collaborativa a Fail2ban: non si limita a bloccare IP sospetti in base ai log locali, ma sfrutta un modello di intelligence condivisa costruita dalla community quando un IP viene segnalato come malevolo su una macchina, l’informazione (in forma anonimizzata) arriva a tutti gli altri utenti del network CrowdSec, permettendo un blocco preventivo ancora prima che l’attacco arrivi sui propri sistemi.
L’architettura si basa su un motore che analizza i log in tempo reale tramite scenari e parser configurabili, un sistema di bouncer che applica il blocco effettivo (a livello di firewall, reverse proxy, o altro), e una console centralizzata opzionale per la gestione multi-macchina.
In questo articolo vedremo come installare CrowdSec su una macchina Ubuntu Server 26.04 pulita, quali collection attivare per un primo hardening (SSH, log di sistema, eventuali servizi web esposti), come configurare il bouncer firewall di base, e alcuni accorgimenti pratici per verificare che tutto funzioni correttamente prima di portarlo in produzione su un ambiente multi-sito come il mio.
PREREQUISITI
- Ubuntu Server 26.04 LTS
- Accesso root o sudo
- Connessione internet attiva
- Minimo 1 GB RAM, 10 GB storage
AGGIORNAMENTO DEL SISTEMA
Prima di tutto aggiornare i pacchetti con il comando:
|
0 |
sudo apt update && sudo apt upgrade -y |
AGGIUNTA DEL REPOSITORY UFFICIALE DI CROWDSEC
CrowdSec distribuisce i pacchetti tramite il proprio repository APT. Aggiungilo con lo script ufficiale:
|
0 |
curl -s https://packagecloud.io/install/repositories/crowdsec/crowdsec/script.deb.sh | sudo bash |
Lo script importa la chiave GPG, registra il repository e aggiorna la cache APT.
Dovremmo visualizzare il seguente output:
|
0 1 2 3 4 5 6 7 8 9 10 11 12 13 |
Detected operating system as Ubuntu/resolute. Checking for curl... Detected curl... Checking for gpg... Detected gpg... Detected apt version as 3.2.0 Running apt-get update... done. Installing apt-transport-https... done. Installing /etc/apt/sources.list.d/crowdsec_crowdsec.list...done. Importing packagecloud gpg key... Packagecloud gpg key imported to /etc/apt/keyrings/crowdsec_crowdsec-archive-keyring.gpg done. Running apt-get update... done. The repository is setup! You can now install packages. |
NOTA BENE: se preferisci non fare pipe di curl direttamente in bash, puoi scaricare lo script, esaminarlo e poi eseguirlo manualmente.
ATTENZIONE: Per Ubuntu Pro/ESM, se hai i repository universe abilitati, il sistema potrebbe proporre CrowdSec 1.4.6 (versione obsoleta). Crea un pinning per forzare il repo ufficiale:
|
0 1 2 3 4 5 |
sudo tee /etc/apt/preferences.d/crowdsec << 'EOF' Package: crowdsec* Pin: origin packagecloud.io Pin-Priority: 900 EOF sudo apt update |
INSTALLAZIONE DELL’AGENT
Installare l’agent con il seguente comando:
|
0 |
sudo apt install -y crowdsec |
Durante l’installazione CrowdSec rileva automaticamente i servizi in esecuzione (sshd, nginx, ecc.) e scarica le relative collection di default dal CrowdSec Hub.
Al termine dovremmo visualizzare il seguente output:
|
0 1 2 3 4 5 6 7 8 9 10 11 12 13 14 15 16 17 18 19 20 21 22 23 24 25 26 27 28 29 30 31 32 33 34 35 36 37 38 |
The following packages were automatically installed and are no longer required: linux-headers-7.0.0-14 linux-image-unsigned-7.0.0-14-generic linux-modules-7.0.0-14-generic linux-tools-7.0.0-14-generic linux-headers-7.0.0-14-generic linux-main-modules-zfs-7.0.0-14-generic linux-tools-7.0.0-14 Use 'sudo apt autoremove' to remove them. Installing: crowdsec Summary: Upgrading: 0, Installing: 1, Removing: 0, Not Upgrading: 2 Download size: 42.2 MB Space needed: 140 MB / 40.1 GB available Get:1 http://archive.ubuntu.com/ubuntu resolute/universe amd64 crowdsec amd64 1.4.6-10.1 [42.2 MB] Fetched 42.2 MB in 2s (23.9 MB/s) Selecting previously unselected package crowdsec. (Reading database… 180436 files and directories currently installed.) Preparing to unpack …/crowdsec_1.4.6-10.1_amd64.deb… Unpacking crowdsec (1.4.6-10.1)… Setting up crowdsec (1.4.6-10.1)… I: Registering to LAPI (/etc/crowdsec/local_api_credentials.yaml) I: Registering to CAPI (/etc/crowdsec/online_api_credentials.yaml) I: Setting up offline hub (see README.Debian) I: Enabling upstream-recommended items, first installation (via symlinks from /etc/crowdsec) I: Enabling WAL for SQLite [fstype=ext4] (see README.Debian) Created symlink '/etc/systemd/system/multi-user.target.wants/crowdsec.service' → '/usr/lib/systemd/system/crowdsec.service'. W: Restarting manually to force a CAPI pull (upstream #2120) Scanning processes... Scanning linux images... Running kernel seems to be up-to-date. No services need to be restarted. No containers need to be restarted. No user sessions are running outdated binaries. No VM guests are running outdated hypervisor (qemu) binaries on this host. |
Verificare cosa è stato installato con il comando:
|
0 |
sudo cscli collections list |
Dovremmo visualizzare il seguente output:
|
0 1 2 3 4 5 6 7 8 9 10 |
COLLECTIONS ────────────────────────────────────────────────────────────────────────────────────────────────────────────────────── Name 📦 Status Version Local Path ────────────────────────────────────────────────────────────────────────────────────────────────────────────────────── crowdsecurity/apache2 ✔️ enabled 0.1 /etc/crowdsec/collections/apache2.yaml crowdsecurity/base-http-scenarios ✔️ enabled 0.6 /etc/crowdsec/collections/base-http-scenarios.yaml crowdsecurity/http-cve ✔️ enabled 1.9 /etc/crowdsec/collections/http-cve.yaml crowdsecurity/linux ✔️ enabled 0.2 /etc/crowdsec/collections/linux.yaml crowdsecurity/nginx ✔️ enabled 0.2 /etc/crowdsec/collections/nginx.yaml crowdsecurity/sshd ⚠️ enabled,tainted 0.2 /etc/crowdsec/collections/sshd.yaml ────────────────────────────────────────────────────────────────────────────────────────────────────────────────────── |
INSTALLAZIONE DEL FIREWALL BOUNCER
Il bouncer è il componente che applica concretamente i blocchi. Scegli la versione corretta in base al tuo stack firewall:
Se si utilizza iptables (default su Ubuntu):
|
0 |
sudo apt install -y crowdsec-firewall-bouncer-iptables |
Se si utilizza nftables nativo:
|
0 |
sudo apt install -y crowdsec-firewall-bouncer-nftables |
ATTENZIONE: se il tuo sistema usa nftables nativo e installi il bouncer iptables, sembrerà funzionare ma non bloccherà nulla.
Verificare con il comando:
|
0 |
sudo nft list ruleset |
Se il comando restituisce output, stai usando nftables.
Il bouncer si registra automaticamente con l’agent locale e inizia subito ad applicare blocchi, inclusa la community blocklist sincronizzata dal cloud CrowdSec.
VERIFICA DEL FUNZIONAMENTO
Abilita il servizio all’avvio e verifica lo stato con i comandi:
|
0 1 2 |
sudo systemctl enable crowdsec sudo systemctl status crowdsec |
Se è tutto OK dovremmo visualizzre il seguente output:
|
0 1 2 3 4 5 6 7 8 9 10 11 12 13 |
● crowdsec.service - Crowdsec agent Loaded: loaded (/usr/lib/systemd/system/crowdsec.service; enabled; preset: enabled) Active: active (running) since Sat 2026-07-11 14:14:40 UTC; 3min 55s ago Invocation: 10a04e4e854f49e5b1388a0b56db5afc Main PID: 2909 (crowdsec) Tasks: 9 (limit: 6227) Memory: 49.3M (peak: 50.5M) CPU: 3.144s CGroup: /system.slice/crowdsec.service ├─2909 /usr/bin/crowdsec -c /etc/crowdsec/config.yaml └─2916 journalctl --follow -n 0 _SYSTEMD_UNIT=ssh.service Jul 11 14:14:39 vm-srv-test systemd[1]: Starting crowdsec.service - Crowdsec agent... Jul 11 14:14:40 vm-srv-test systemd[1]: Started crowdsec.service - Crowdsec agent. |
Controllare le metriche di acquisizione log con il comando:
|
0 |
sudo cscli metrics |
Dovremmo visualizzare il seguente output:
|
0 1 2 3 4 5 6 7 8 9 10 11 12 13 14 15 16 17 18 19 20 21 22 23 24 25 26 27 28 29 30 31 32 33 34 35 36 37 38 39 40 41 |
Acquisition Metrics: ╭────────────────────────┬────────────┬──────────────┬────────────────┬────────────────────────╮ │ Source │ Lines read │ Lines parsed │ Lines unparsed │ Lines poured to bucket │ ├────────────────────────┼────────────┼──────────────┼────────────────┼────────────────────────┤ │ file:/var/log/auth.log │ 21 │ - │ 21 │ - │ │ file:/var/log/syslog │ 20 │ - │ 20 │ - │ ╰────────────────────────┴────────────┴──────────────┴────────────────┴────────────────────────╯ Parser Metrics: ╭─────────────────────────────────┬──────┬────────┬──────────╮ │ Parsers │ Hits │ Parsed │ Unparsed │ ├─────────────────────────────────┼──────┼────────┼──────────┤ │ child-crowdsecurity/syslog-logs │ 41 │ 41 │ - │ │ crowdsecurity/syslog-logs │ 41 │ 41 │ - │ ╰─────────────────────────────────┴──────┴────────┴──────────╯ Local Api Metrics: ╭────────────────────┬────────┬──────╮ │ Route │ Method │ Hits │ ├────────────────────┼────────┼──────┤ │ /v1/heartbeat │ GET │ 4 │ │ /v1/watchers/login │ POST │ 2 │ ╰────────────────────┴────────┴──────╯ Local Api Machines Metrics: ╭──────────────────────────────────┬───────────────┬────────┬──────╮ │ Machine │ Route │ Method │ Hits │ ├──────────────────────────────────┼───────────────┼────────┼──────┤ │ 85a4c273f3ce42408c076d300194eca0 │ /v1/heartbeat │ GET │ 4 │ ╰──────────────────────────────────┴───────────────┴────────┴──────╯ Local Api Decisions: ╭─────────────────┬────────┬────────┬───────╮ │ Reason │ Origin │ Action │ Count │ ├─────────────────┼────────┼────────┼───────┤ │ ssh:bruteforce │ CAPI │ ban │ 2702 │ │ http:bruteforce │ CAPI │ ban │ 538 │ │ http:crawl │ CAPI │ ban │ 6042 │ │ http:dos │ CAPI │ ban │ 585 │ │ http:exploit │ CAPI │ ban │ 4671 │ │ http:scan │ CAPI │ ban │ 460 │ ╰─────────────────┴────────┴────────┴───────╯ |
Se i contatori di acquisizione crescono mentre i log si riempiono, l’agent sta leggendo correttamente.
Se rimangono a zero, il problema è quasi sempre un percorso log non standard: controllare e correggere /etc/crowdsec/acquis.yaml.
CONFIGURAZIONE DELLE COLLECTION
Le collection sono bundle di parser e scenari per uno specifico servizio. Installare solo quelle relative ai servizi realmente in esecuzione sulla macchina.
Collection base (consigliate per tutti i server)
bash# Rilevamento pattern SSH brute-force (già inclusa di default)
|
0 |
sudo cscli collections install crowdsecurity/sshd |
# Pattern HTTP per exploit CVE generici (/.env, /wp-config.php.bak, ecc.)
|
0 |
sudo cscli collections install crowdsecurity/http-cve |
# Pattern privilege escalation locale da auth.log
|
0 |
sudo cscli collections install crowdsecurity/linux-lpe |
Collection aggiuntive (in base ai servizi installati)
bash# Solo se usi Nginx
|
0 |
sudo cscli collections install crowdsecurity/nginx |
# Solo se usi Apache
|
0 |
sudo cscli collections install crowdsecurity/apache2 |
# Solo se usi WordPress
|
0 |
sudo cscli collections install crowdsecurity/wordpress |
# Solo se MariaDB/MySQL è esposto in rete (non localhost)
|
0 |
sudo cscli collections install crowdsecurity/mariadb |
# Solo se usi il tarpit SSH endlessh
|
0 |
sudo cscli collections install crowdsecurity/endlessh |
Regola pratica: non installare collection per servizi che non hai. Ogni parser aggiunge overhead e rumore nel log delle decisioni. Tratta le collection come le regole firewall: minima superficie, intento esplicito.
Dopo l’installazione di nuove collection, riavvia l’agent con il comando:
|
0 |
sudo systemctl restart crowdsec |
Verificare gli scenari attivi con i seguenti comandi:
|
0 1 2 |
sudo cscli collections list sudo cscli scenarios list |
CONFIGURAZIONE DELLE SORGENTI LOG (ACQUIS.YAML)
Se hai percorsi log non standard o vuoi aggiungere manualmente delle sorgenti, modificare /etc/crowdsec/acquis.yaml con il comando:
|
0 |
sudo nano /etc/crowdsec/acquis.yaml |
Esempio di configurazione per SSH e Nginx:
|
0 1 2 3 4 5 6 7 8 9 10 11 12 |
yaml--- # Log SSH filenames: - /var/log/auth.log labels: type: syslog --- # Log Nginx filenames: - /var/log/nginx/access.log - /var/log/nginx/error.log labels: type: nginx |
Dopo le modifiche eseguire il comando:
|
0 |
sudo systemctl restart crowdsec |
COLLEGAMENTO ALLA CROWDSEC CONSOLE (OPZIONALE MA CONSIGLIATO)
La console web gratuita su app.crowdsec.net offre un dashboard centralizzato con alert, decisioni, statistiche e mappa geografica degli attacchi.
La procedura di enrollment prevede i seguenti passaggi:
Creare un account su app.crowdsec.net
Andare su Security Engines → Add → copiare il comando di enrollment
Eseguilo sul server:
|
0 |
sudo cscli console enroll <IL_TUO_TOKEN> |
Approvare l’istanza dalla Console web
Riavviare l’agent (passaggio obbligatorio):
|
0 |
sudo systemctl restart crowdsec |
ATTENZIONE: senza il riavvio, l’istanza risulta enrollata ma non trasmette dati alla Console.
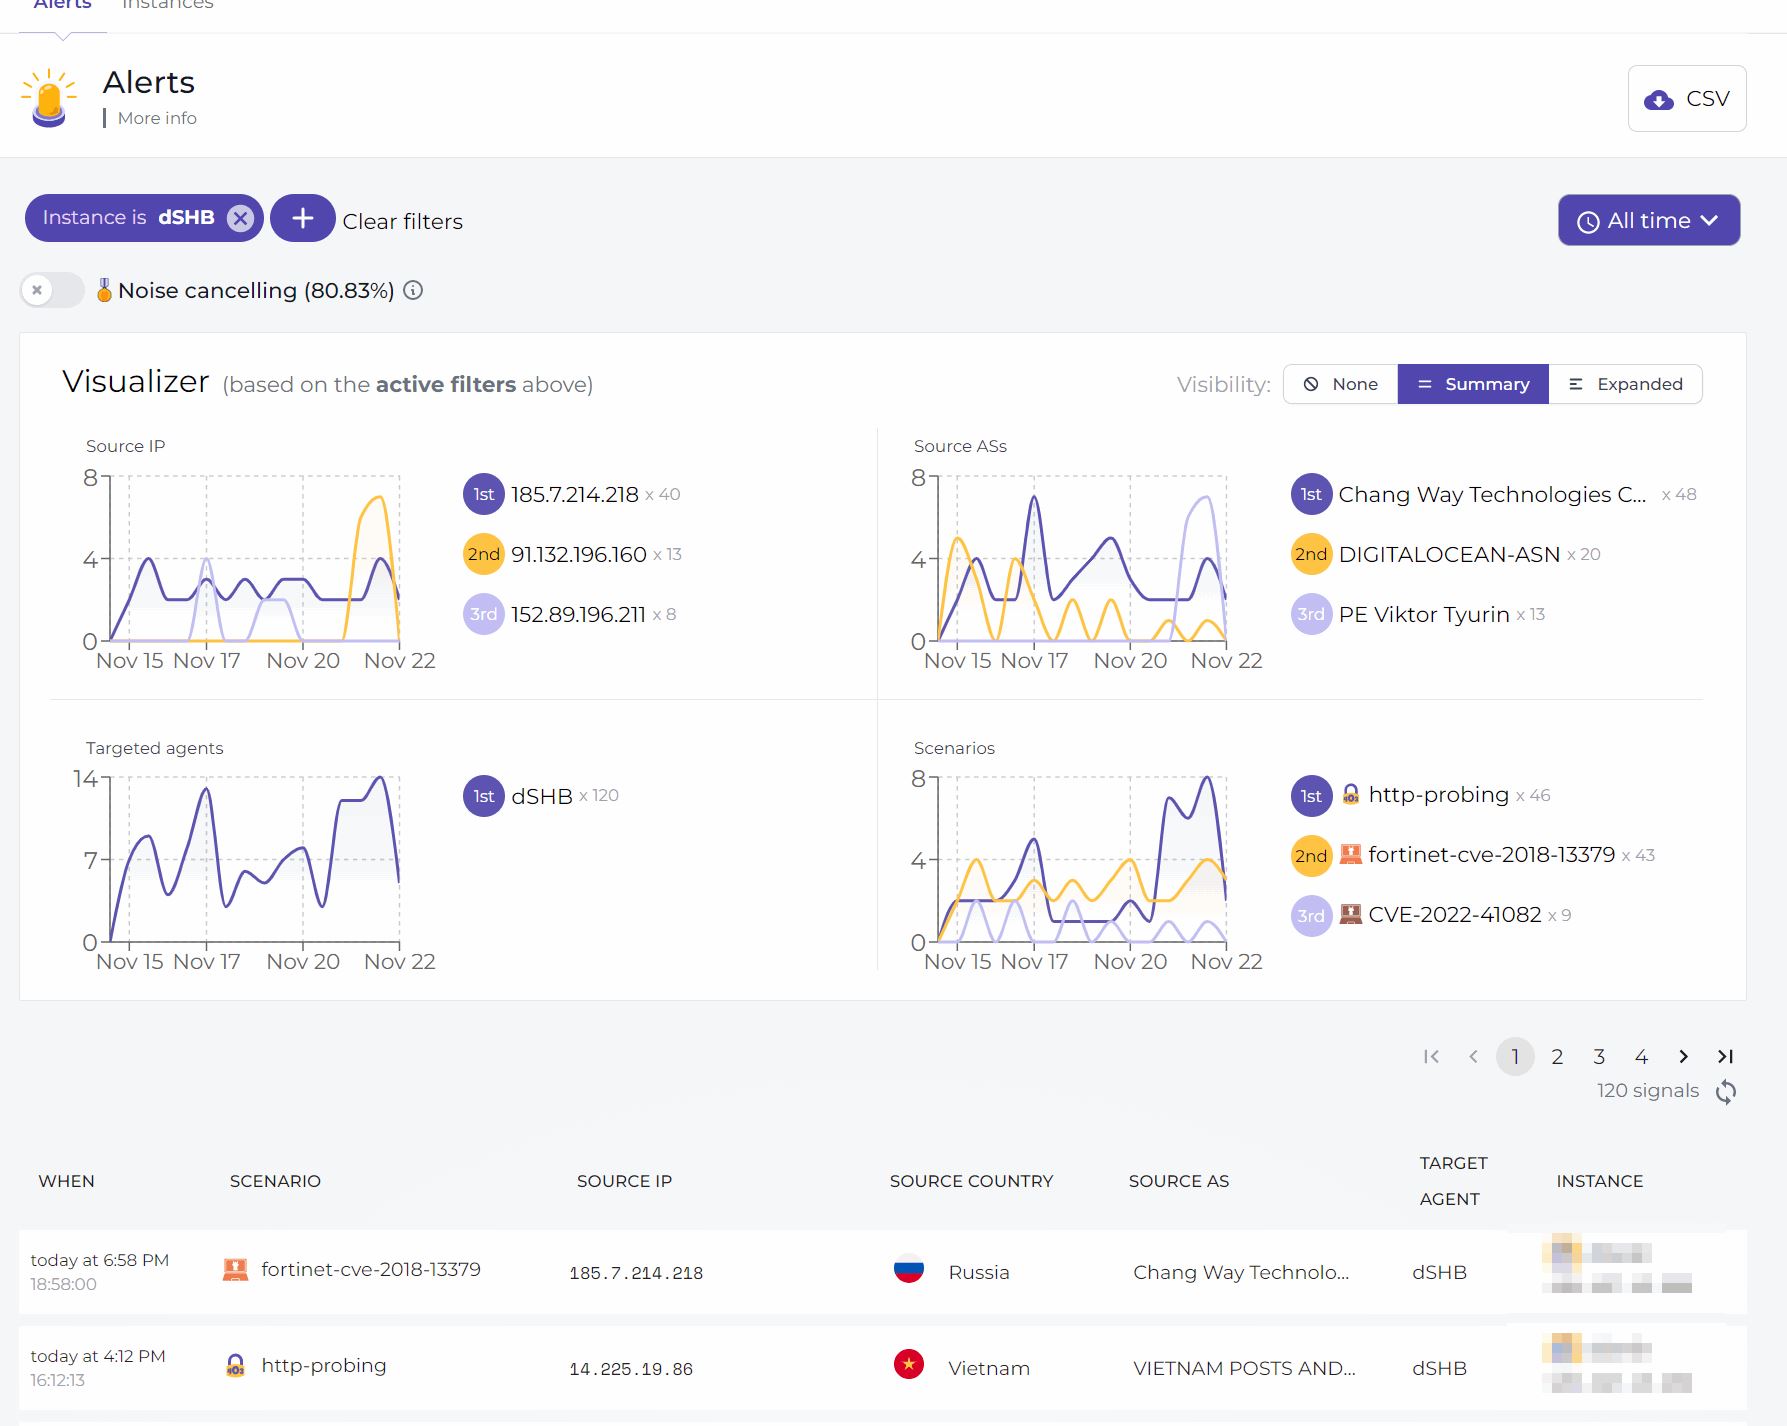
Se è tutto OK dovremmo visualizzare la Dashboard di Crowdsec come mostrato nell’immagine sovrastante
COMANDI UTILI PER LA GESTIONE QUOTIDIANA
bash# Visualizza le decisioni attive (IP bannati)
|
0 |
sudo cscli decisions list |
# Visualizza gli alert recenti
|
0 |
sudo cscli alerts list |
# Aggiungi manualmente un ban
|
0 |
sudo cscli decisions add --ip 1.2.3.4 --duration 24h --reason "test ban" |
# Rimuovi un ban
|
0 |
sudo cscli decisions delete --ip 1.2.3.4 |
# Whitelist permanente di un IP
|
0 |
sudo cscli allowlists add mywhitelist --ip 192.168.1.100 |
# Aggiorna hub (parser, scenari, collection)
|
0 1 |
sudo cscli hub update sudo cscli hub upgrade |
# Stato dei bouncer registrati
|
0 |
sudo cscli bouncers list |
# Metriche dettagliate
|
0 |
sudo cscli metrics |





0 Commenti